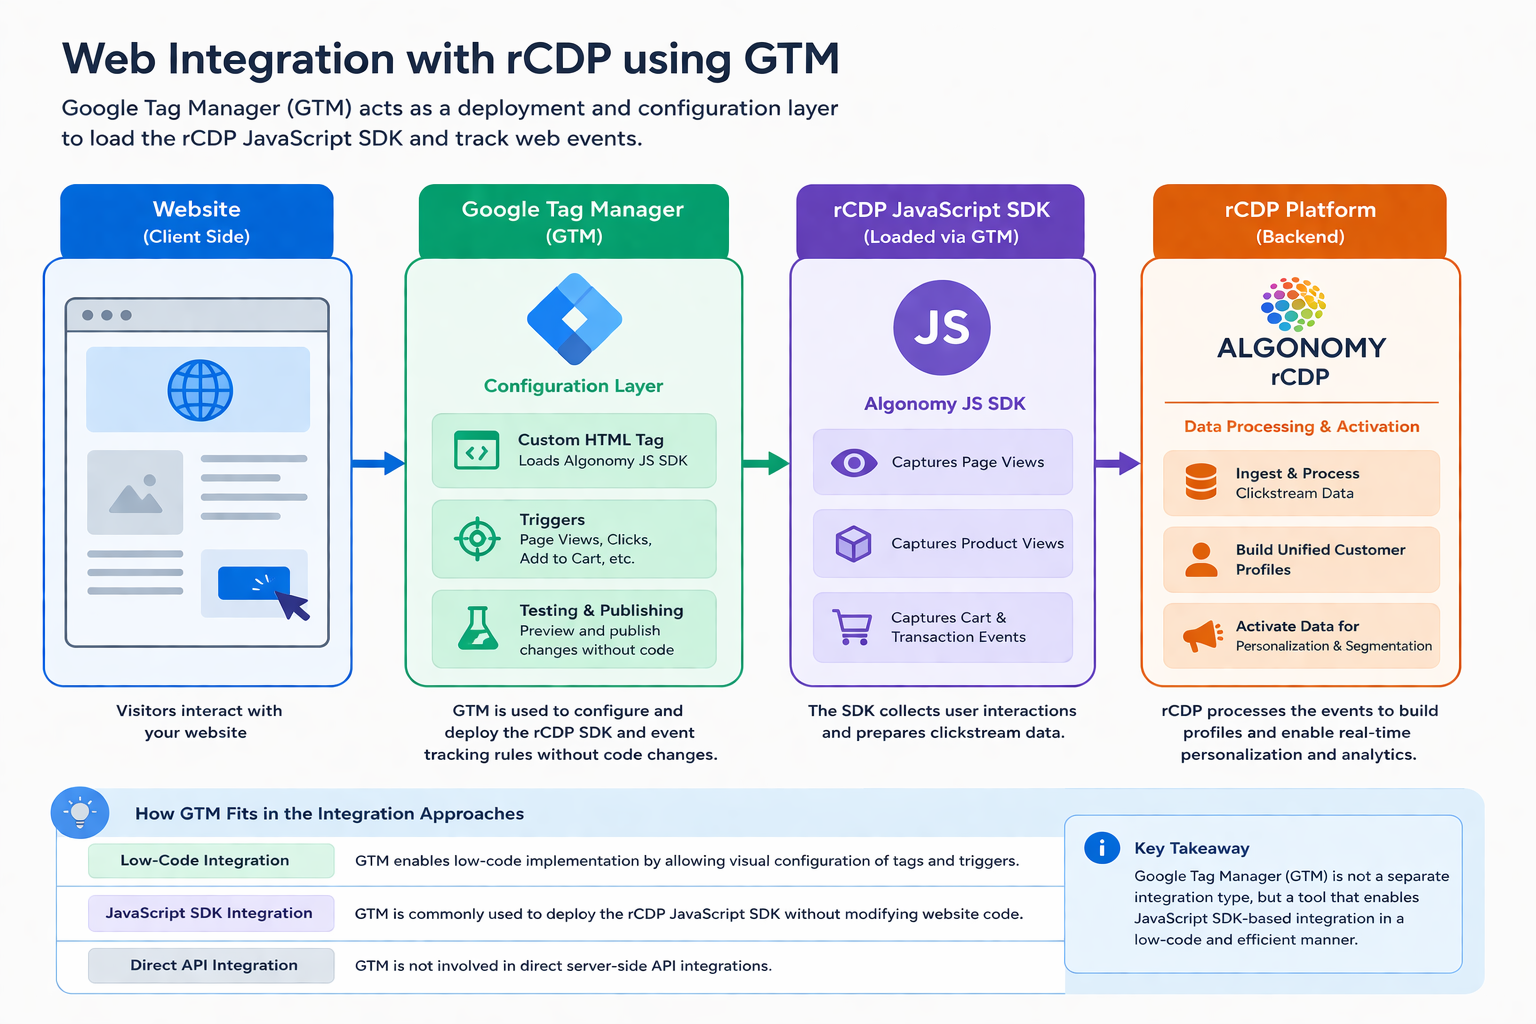
Clickstream events, such as page views, button clicks, add-to-cart actions, and checkout steps, can be easily tracked and sent to the
Once the
Google Tag Manager is a tag management tool that allows you to add and manage tracking scripts on your website without repeatedly modifying the site’s code, it's an easy and flexible deployment of the rCDP SDK on your website. It acts as an intermediary layer between your website and third-party tools like
To learn more about GTM, see About Google Tag-Manager (external Google link).
Tags are small pieces of tracking code. In GTM, you create tags that contain
GTM is widely used on websites, especially native or custom-built eCommerce platforms, where multiple tracking and marketing tools need to be integrated. Instead of embedding different scripts across the codebase, GTM centralizes all tracking in one place.
Initially, developers add the GTM container snippet to the website. After this one-time setup, tags such as the rCDP SDK can be configured within GTM using features like Custom HTML tags. Tracking events—such as page views, clicks, or add-to-cart actions—are set up using triggers. Once configured, all changes can be tested and published directly from GTM without further code modifications.
| Area | Direct Integration | GTM Integration |
|---|---|---|
| SDK Installation | Code change | GTM tag |
| Event Tracking | JS in code | GTM triggers |
| Deployment | Dev release | Instant publish |
| Ownership | Engineering | Marketing / Product |
Deploying the rCDP SDK through GTM (instead of hard-coding it directly into your website) provides greater flexibility, control, and speed. The following are the key benefits of tracking clickstream events through GTM:
Reduces dependency on developers — Routine tracking updates no longer require engineering team involvement.
Empowers marketing and product teams — Allows them to add, modify, or pause events independently without code changes.
Accelerates implementation — Updates can be tested and published instantly from the GTM interface, bypassing lengthy development cycles.
Improves maintainability — All tags, triggers, and events are organized and managed in a single centralized interface.
Minimizes risk to core site functionality — All changes are made outside the main application code, reducing the chance of breaking the website.
Provides full control over rCDP events — You can precisely control when and how clickstream events are sent to the
Enables safe testing — GTM’s built-in Preview and Debug Mode allows thorough testing before publishing.
To start tracking clickstream events with
GTM Container Setup (One-time Developer Task)
rCDP SDK Deployment through GTM
After completing these steps, the rCDP SDK will be active on your website, and you can begin configuring clickstream event tracking using GTM tags and triggers.
Google Tag Manager (GTM) container setup on a website is a simple, one-time installation done by developers. Once the GTM container code (snippet) is added to the website, all further tracking tags, triggers, and updates can be managed directly from the GTM interface without touching the website code again.
Developers create a GTM account and container in the GTM interface.
They copy the GTM container snippet (two small code blocks: one <script> for the <head> section and one <noscript> for the <body> section).
This snippet is added to every page of the website (usually in the site template or layout file).
Once installed, no further code changes are needed on the website. All tracking tags (e.g., rCDP SDK via Custom HTML), triggers (for events like page views, clicks, add-to-cart), and variables are configured and published directly from the GTM web interface by marketing or product teams.
To learn more about GTM installation, see Get started with tag manager (external Google link).
Before you start deploying rCDP SDK through GTM:
You must have already setup the Google Tag Manager container snippet on your website (one-time developer task).
You should have access to the
You should have access to the
Basic understanding of GTM Tags and Triggers is recommended.
To inject the rCDP SDK in GTM, create a new Custom HTML tag in GTM that loads the
In your GTM workspace, go to the left sidebar and click Tags → New.
Under Tag Configuration → Tag Type, select Custom HTML as the tag type.
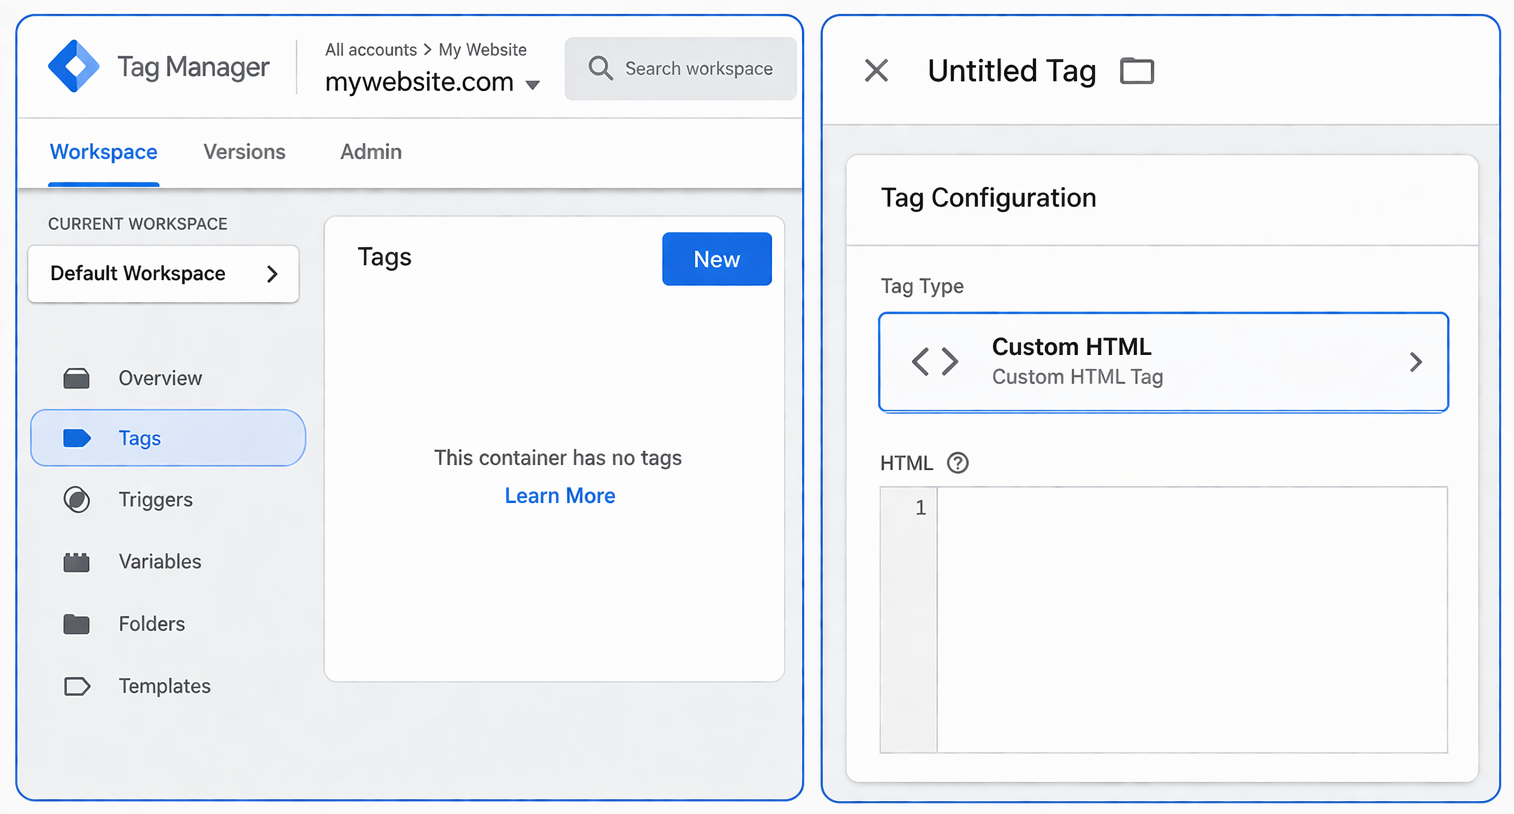
In the HTML field, paste the following
<script type="text/javascript" src="https://rcdp-us.algonomy.com/js/<TENANT_HASH>/<SITE_HASH>.js"async> </script>
Replace <TENANT_HASH> and <SITE_HASH> with your actual values from
Click on Triggering drop-down and choose a trigger.
For loading the SDK on every page, use the built-in All Pages trigger
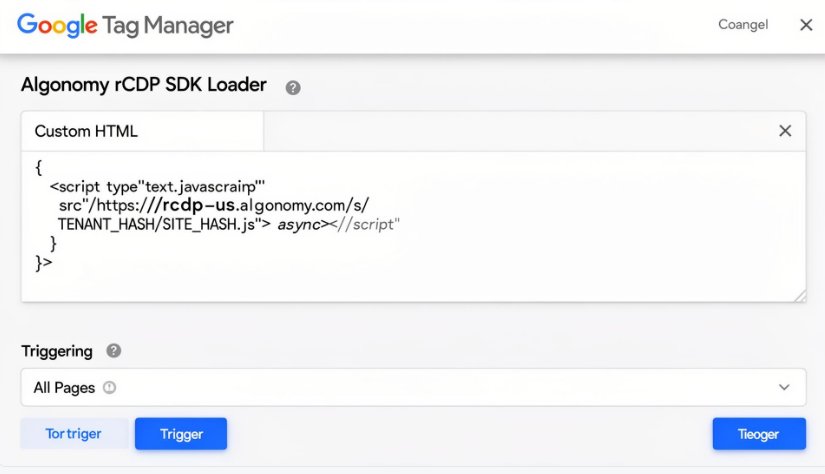
Click Save.
Provide a name and save the tag.
Give the tag a clear name, for example: rCDP SDK - Page Loader or
Test and Publish.
Use GTM Preview Mode to test the tag on your website.
Verify that the rCDP SDK loads correctly and events fire as expected.
Once validated, click Submit and Publish the container.
XXXX
Inject the
Zero site-code changes — inject the SDK and all event tags from the GTM console.
Centralised tag control — add, pause, or modify event tracking without developer deploys.
Built-in preview & debug — test every tag in GTM Preview Mode before publishing.
Create a Custom HTML tag in GTM that loads the
Open GTM → Tags → New
In your GTM workspace, click Tags in the left sidebar, then New.
Choose 'Custom HTML' as tag type
Click the Tag Configuration panel and select Custom HTML.
Paste the SDK loader script
Paste the following into the HTML field:
<script type="text/javascript"
src="https://rcdp-us.algonomy.com/js/<TENANT_HASH>/<SITE_HASH>.js"
async>
</script>
Replace placeholders
Replace <TENANT_HASH> and <SITE_HASH> with your actual values from
Set Triggering → All Pages
Under Triggering, select the built-in All Pages trigger so the SDK loads on every page view.
Name & Save
Name the tag "
After setting up the
For every page or interaction you want to track, create another Custom HTML tag that calls:
rcdp.executeEventByData(eventData, eventType);
Each tag should have a trigger that matches the specific page or event (e.g., a Page View trigger filtered by URL path).
Below is an example of firing eventCategory when a user views a category/listing page.
Create a new Custom HTML tag, go to Tags → New → Custom HTML and paste the following script:
<script>
rcdp.executeEventByData({
parentCategoryId: "parent001",
categoryId: "cat001"
}, "eventCategory");
</script>
Create a trigger for category pages, click Triggers → New → Page View, then set:
Trigger fires on: Some Page Views
Condition: Page URL contains /collections/ (or your category URL pattern)
Specify a Name for the tag for example "
GTM — Custom HTML Tag: Category Page Event
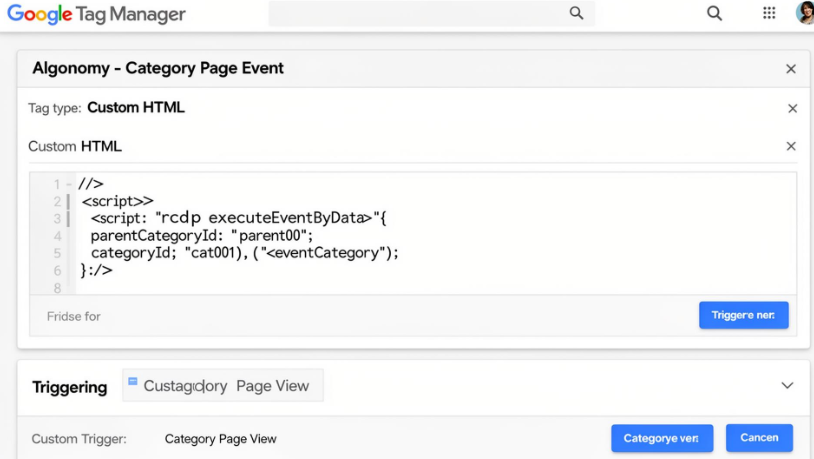
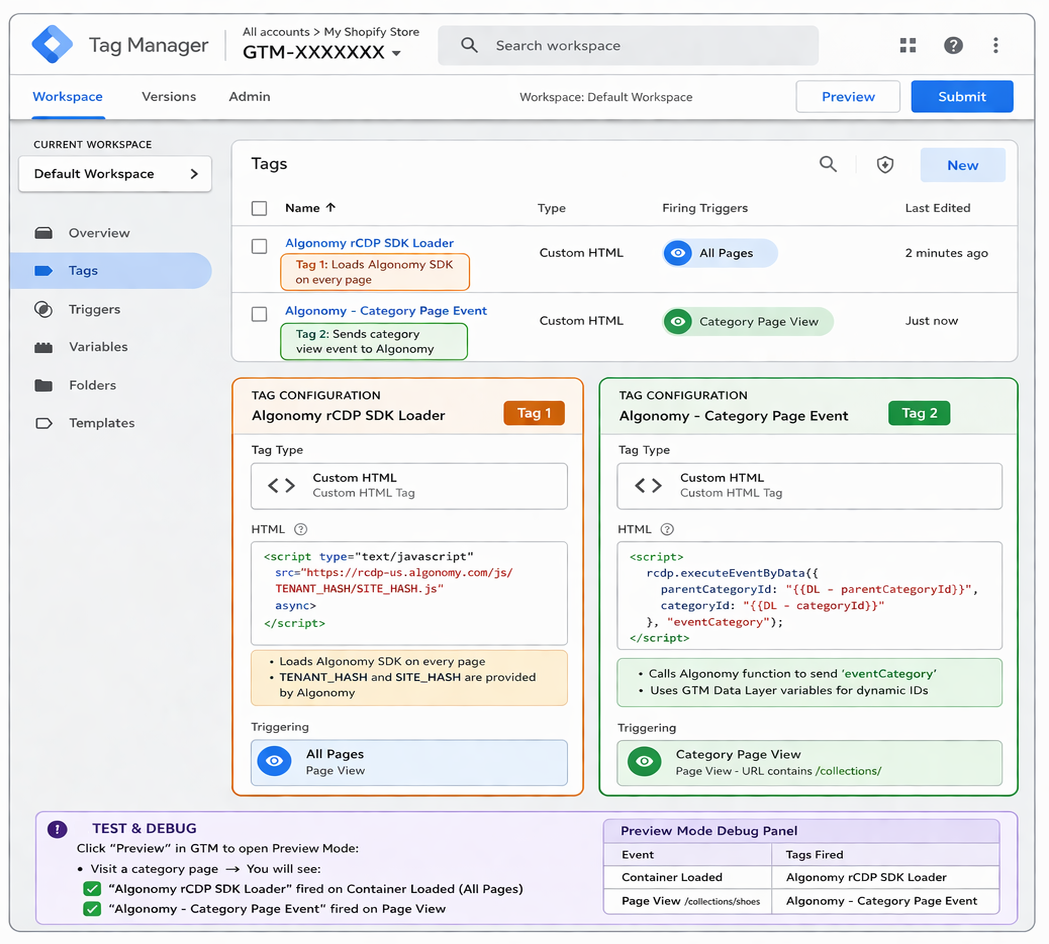
For production, always pull category IDs dynamically from the GTM Data Layer or JavaScript variables instead of hard-coding them. This ensures your tracking adapts automatically to changes and is easier to maintain.
<script>
// Use GTM Variables or dataLayer values for dynamic IDs
var catId   = {{DL - categoryId}};   // Data Layer Variable
var parentId = {{DL - parentCategoryId}};

rcdp.executeEventByData({
parentCategoryId: parentId,
categoryId: catId
}, "eventCategory");
</script>
To preview your setup:
Click Preview in your GTM workspace.
Navigate to a category page on your site — the debug panel should show the "
On the same page, confirm that the "
Open DevTools → Network and filter for rCDP and verify that the API call is successfully sent.
The Category Page example above uses the same rcdp.executeEventByData() pattern for every event. See the full list of events — Home, Search, Product, Add to Cart, Checkout, Transaction, Login, and more — with ready-to-use code:
View all event samples
Event Taxonomy Reference
JS SDK Quick Start
Consent Management
Direct REST APIs