iOS SDK
Overview
ADA rCDP Mobile iOS SDK enables you to capture user behavior and clickstream events from native iOS applications. It allows you to track user interactions, manage customer profiles, and deliver personalized experiences such as push notifications and In-App Notifications.
The SDK integrates directly into your application and sends structured event data to rCDP in real time. This ensures that mobile data is unified with web and backend data for a complete customer view.
How It Works
-
The SDK is initialized when the application launches
-
User interactions are captured as Clickstream Events
-
Customer data is stored and updated using Customer Profiles
-
The SDK enriches events with device, session, and app metadata
-
Events are sent to rCDP for processing and activation
SDK Integration
Follow these steps to integrate the rCDP iOS SDK into your application.
Step 1: Add SDK to Project
-
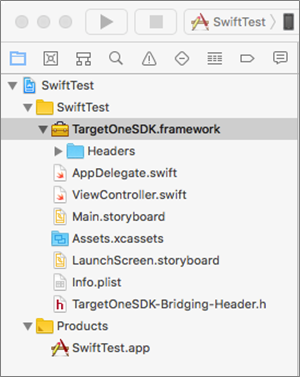
Download the SDK framework
-
Add it to your Xcode project
-
Ensure it is included under the target
Step 2: Configure Permissions
-
Enable Push Notifications
-
Configure App Transport Security if required
-
Enable Background Modes
Step 3: Initialize SDK
Objective-C
[TargetOne setLogLevel:T1_LL_VERBOSE];
TargetOne *_targetOne = [TargetOne sharedInstance];
T1Config *t1Config = [T1Config new];
t1Config.enableNotification = YES;
t1Config.tenantHash = “YOUR_TENANT_ID”;
[_targetOne initialize:t1Config];
Swift
TargetOne.setLogLevel(T1_LL_VERBOSE)
let targetOne = TargetOne.sharedInstance()
let t1Config = T1Config()
t1Config.enableNotification = true
t1Config.tenantHash = "YOUR_TENANT_ID"
targetOne?.initialize(t1Config)
Step 4: Verify Integration
-
Trigger a sample event
-
Check logs in Xcode console
-
Verify events in rCDP dashboard
SDK Methods
The iOS SDK supports the following SDK methods:
Customer Profiles
Real-time CDP stores user demographic data, app interactions, campaign visits, and transaction history to build a complete customer profile.
A Customer Profile is automatically created when a user launches your mobile application. Initially, the profile is created as Anonymous, meaning it does not contain identifiable information.
You can enrich the profile with attributes such as Name, Email, Mobile Number, and Customer ID.
Important Notes
-
Set Customer Profile must be called before eventCustomerCreate, eventLogin, and eventLogout
-
If the user logs in before SDK integration, call Set Customer Profile immediately after initialization
Set Customer Profile
Objective-C
T1CustomerProfile *profile = [T1CustomerProfile new];
profile.custCode = self.txtCustomerCode.text;
profile.emailId = @"sample@mail.com";
profile.mobileNumber = @"9876543210";

[[TargetOne sharedInstance] setCustomerProfile:profile];
Swift
let profile = T1CustomerProfile()
profile.custCode = "100"
profile.mobileNumber = "9876543210"
profile.emailId = "sample@email.com"

TargetOne.sharedInstance().setCustomerProfile(profile)
Equivalent Payload (JSON)
{
"customerProfile": {
"custCode": "100",
"emailId": "sample@email.com",
"mobileNumber": "9876543210"
}
}
Clickstream Events
A Clickstream Event represents a user action performed within your application. These events are recorded with an event name and associated properties.
This enables segmentation, targeting, and personalization based on user behavior.
Send Clickstream Event
Objective-C
NSDictionary *props = @{
@"categoryId": @"100"
};

[[TargetOne sharedInstance] sendClickStream:@"eventCategory" withProps:props];
Swift
let props = [
"categoryId": "100"
]

TargetOne.sharedInstance()?.sendClickStream("eventCategory", withProps: props)
Equivalent Payload (JSON)
{
"eventName": "eventCategory",
"eventType": "clickstream",
"properties": {
"categoryId": "100"
}
}
Supported Data Types
-
String
-
Number
-
Boolean
-
NSDate (timestamp-based tracking)
In-App Notifications
In-App Notifications allow you to engage users within the application using contextual messages triggered by user behavior or predefined campaigns.
These notifications are configured from the rCDP console and delivered automatically through the SDK.
Display In-App Notifications
The SDK automatically displays In-App Notifications based on configured rules and triggers.
Block In-App Notifications
You can block In-App Notifications on specific screens where interruptions are not desired.
Objective-C
[TargetOneSDKContext.blockInApp addObject:@"ViewControllerName"];
Swift
TargetOneSDKContext.blockInApp.add("ViewControllerName")
Debugging
The SDK provides debugging capabilities to help you validate integration and troubleshoot issues during development.
Enable Debug Mode
Objective-C
[TargetOne enableDebugMode:YES];
Swift
TargetOne.enableDebugMode(true)
Verify Events
-
Check Xcode console logs for SDK activity
-
Validate event payloads
-
Confirm event delivery in the rCDP dashboard
Rich Push Notifications
Rich Push Notifications allow you to send media-rich notifications that include images, buttons, and custom layouts to improve user engagement.
Register Device Token
Register the APNs device token with rCDP to enable push notifications.
Objective-C
[[TargetOne sharedInstance] registerDeviceToken:deviceToken];
Swift
TargetOne.sharedInstance().registerDeviceToken(deviceToken)
Handle Push Notification
Handle incoming push notifications from rCDP.
Objective-C
[[TargetOne sharedInstance] handlePushNotification:userInfo];
Swift
TargetOne.sharedInstance().handlePushNotification(userInfo)
Rich Push Setup (High-Level)
-
Create a Notification Service Extension in Xcode
-
Enable media attachments in push payload
-
Configure payload from rCDP dashboard
Example Push Payload
{
"aps": {
"alert": {
"title": "Special Offer",
"body": "Get 20% off on your next purchase"
},
"mutable-content": 1
},
"mediaUrl": "https://example.com/image.jpg"
}
APNs Certificate Creation
Apple Push Notification service (APNs) certificates are required to enable push notifications for your iOS application.
Follow these steps to create and configure the APNs certificate:
-
Log in to the Apple Developer Portal
-
Select your App ID
-
Enable Push Notifications
-
Create a new APNs certificate (Development or Production)
-
Download the certificate
-
Convert the certificate to .p12 format
-
Upload the certificate to the rCDP console
Navigate to Certificates, Identifiers & Profiles
APNs Auth Key Creation
Alternatively, you can use an APNs Auth Key for a more flexible and scalable push notification setup.
Follow these steps to create an APNs Auth Key:
-
Log in to the Apple Developer Portal
-
Navigate to Keys
-
Create a new key with Apple Push Notifications service (APNs) enabled
-
Download the .p8 key file
-
Note the following details:
-
Key ID
-
Team ID
-
Bundle ID
-
-
Upload the key and details to the rCDP console
Push Notification Flow
-
User installs and opens the app
-
Device token is generated and registered with rCDP
-
Campaign is configured in rCDP
-
Notification is sent via APNs
-
SDK receives and displays the notification
Common Use Cases
-
Send personalized offers based on browsing behavior
-
Trigger cart abandonment reminders
-
Deliver transactional notifications (order updates)
-
Engage inactive users with reactivation campaigns
Best Practices
-
Initialize the SDK early in the application lifecycle
-
Use consistent event naming aligned with your event taxonomy
-
Always set customer profile after login
-
Validate event payloads before sending
-
Enable debug mode during development
-
Test push notifications on real devices
-
Use APNs Auth Key for better scalability
-
Ensure compliance with user consent and privacy requirements
Troubleshooting
-
Ensure SDK is initialized correctly
-
Verify API credentials (Tenant ID, API Key)
-
Check network connectivity
-
Validate push notification configuration
-
Check debug logs for errors
Next Steps
-
Proceed to 3.2 Android SDK
-
Proceed to 3.3 React Native SDK