Shopify Pixel Instrumentation
Shopify Pixel Instrumentation uses Shopify Web Pixels to capture customer interaction events directly from Shopify’s Customer Events framework. This approach provides a developer-driven implementation model where each event is explicitly defined, mapped, and transmitted to ADA rCDP.
Unlike No-Code Instrumentation, which automatically captures standard events, Pixel Instrumentation enables you to implement custom tracking logic, enrich payloads with additional metadata, and control how events are structured and delivered to rCDP.
Manual Integration Approach
The Shopify Pixel approach gives full control over event implementation. Each event must be explicitly subscribed, processed, and sent to rCDP.
Unlike auto-capture integrations, developers define how each event is handled, including payload transformation and mapping logic.
When to Use Pixel Integration
-
You require precise control over event payloads
-
Your implementation requires custom tracking logic
-
You need Shopify-specific event handling
How It Works
Customer Action → Shopify Event Bus → Pixel Code Subscribes → Transform / Map Payload → Send to rCDP
Shopify Web Pixels execute JavaScript within a sandboxed iframe environment. Your pixel code listens to Shopify’s event bus, processes event data, and sends structured payloads to ADA rCDP using the SDK.
Development Lifecycle in Shopify
-
Pixel code is written in Shopify’s Custom Pixel editor
-
Testing and debugging occur within Shopify
-
Deployment is managed via Shopify pixel tools
Creating a Custom Pixel in Shopify
-
Log into Shopify as Admin at: https://your-store.myshopify.com/admin.
-
Navigate to Settings > Customer events.
-
Click Add Custom Pixel.
-
Paste your integration code in the Pixel Code editor.
-
Provide a meaningful name for your Pixel such as "ADA Pixel".
-
Add the ADA SDK loader and event subscriptions.
-
Click Connect to activate the pixel.
-
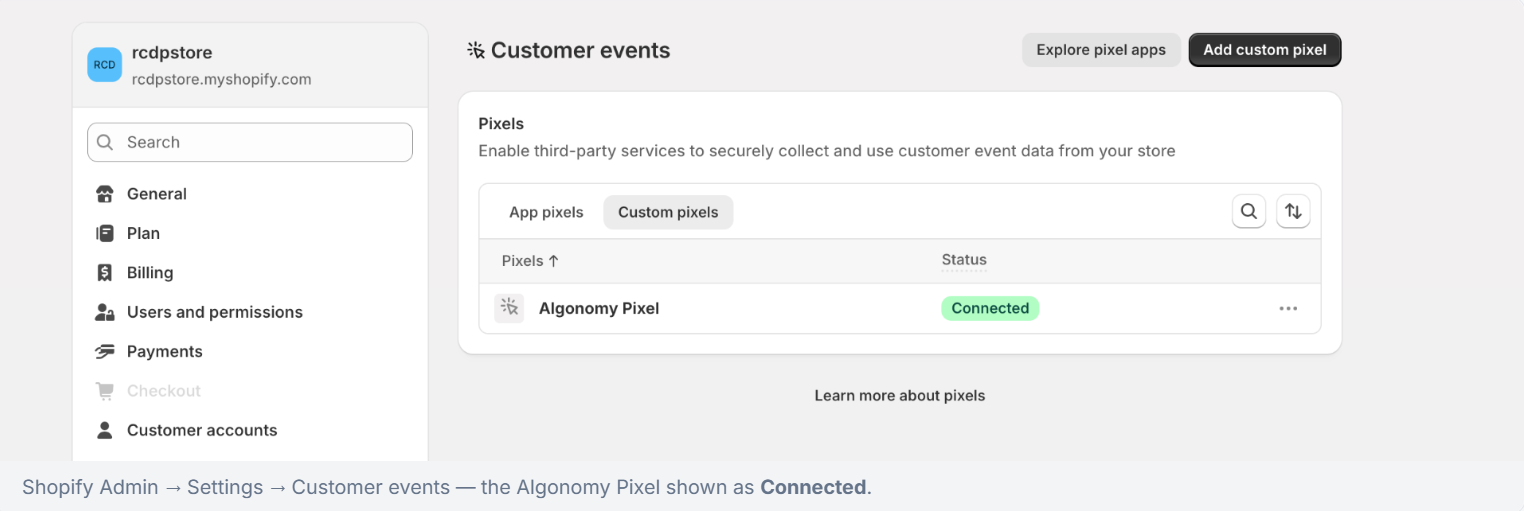
Verify the connection, go to Settings > Customer events, the ADA Pixel is shown as Connected.
The Pixel Code editor is displayed.
Loading ADA rCDP SDK
The ADA rCDP Clickstream JS SDK provides the core runtime required to process and send events to ADA rCDP. It exposes the required event execution methods used by the pixel code, standardizes event payloads according to the rCDP schema, and manages communication with the rCDP platform.
The SDK is loaded asynchronously by dynamically injecting the SDK script into the page. The loader creates a <script> element using the tenant and site configuration values, appends it to the document head, and initializes the SDK once the script finishes loading. This approach prevents duplicate script injection and ensures the SDK loads only once across the pixel runtime. Events triggered before the SDK is ready are queued and executed after the SDK initialization completes, ensuring that no events are lost during page load.
To load ADA rCDP Clickstream JS SDK:
-
Download or copy the ADA rCDP Clickstream JS SDK available here.
-
Before deploying, replace the following placeholders with values provided during onboarding:
<TENANT_HASH>
<SITE_HASH>
-
Paste the code at the top of your Custom Pixel code editor, and load the ADA SDK.
This loader ensures:
-
The SDK loads asynchronously
-
Events are queued until the SDK is ready
-
Duplicate SDK injection is prevented
Global Configuration Example
const Algonomy = {
DEBUG: true,
TENANT_HASH: "<TENANT_HASH>",
SITE_HASH: "<SITE_HASH>",
REGION: {
JS_URL: "https://rcdp-us.algonomy.com",
API_URL: "https://sandbox.algonomy.com"
},
get SCRIPT_URL() {
return `${this.REGION.JS_URL}/js/${this.TENANT_HASH}/${this.SITE_HASH}.js`;
}
};
Supporting Utilities
The pixel integration includes utility components for debugging, performance monitoring, and safe SDK initialization. These utilities ensure reliable SDK loading and provide visibility into event execution.
Debug Logger
The Debug Logger provides structured console logging during development. When debugging is enabled, it outputs logs for SDK loading, event execution, and errors.
function algonomyLog(level, message, data) {
if (!ALGONOMY.DEBUG) return;
const prefix = "[Algonomy Pixel]";
switch (level) {
case "error": console.error(prefix, message, data || ""); break;
case "warn": console.warn(prefix, message, data || ""); break;
default: console.log(prefix, message, data || "");
}
}
Performance Metrics
Performance Metrics track SDK loading time and event execution latency. This helps monitor performance impact and debug slow event handling.
const AlgonomyPerf = {
sdkStart: 0, sdkEnd: 0,
markSDKStart() { this.sdkStart = performance.now(); },
markSDKEnd() {
this.sdkEnd = performance.now();
algonomyLog("log", `SDK Loaded in ${(this.sdkEnd - this.sdkStart).toFixed(2)} ms`);
},
measureEvent(eventName, fn) {
const start = performance.now();
fn();
const end = performance.now();
algonomyLog("log", `${eventName} executed in ${(end - start).toFixed(2)} ms`);
}
};
Singleton SDK Loader
The Singleton Loader ensures that the SDK loads only once within the Shopify pixel environment. It also queues events until the SDK is ready.
if (!window.__algonomyLoader) {
window.__algonomyLoader = {
loaded: false,
loading: false,
customerSet: false,
queue: []
};
}

function loadAlgonomy(callback) {
const loader = window.__algonomyLoader;
if (typeof callback === "function") loader.queue.push(callback);

if (loader.loaded) { flushQueue(); return; }
if (loader.loading) return;

loader.loading = true;
AlgonomyPerf.markSDKStart();

if (!document.querySelector("script[data-algonomy]")) {
const script = document.createElement("script");
script.src = ALGONOMY.SCRIPT_URL;
script.async = true;
script.setAttribute("data-algonomy", "true");

script.onload = waitForReady;
script.onerror = function () {
loader.loading = false;
algonomyLog("error", "SDK failed to load");
};

document.head.appendChild(script);
} else {
waitForReady();
}

function waitForReady() {
const interval = setInterval(() => {
if (window.rcdp && typeof rcdp.executeEventByData === "function") {
clearInterval(interval);

loader.loaded = true;
loader.loading = false;

AlgonomyPerf.markSDKEnd();

if (ALGONOMY.DEBUG) {
console.log("%cAlgonomy Pixel Loaded",
"background:#111;color:#00ff99;padding:4px 8px;border-radius:4px;");
}

setCustomerIfExists();
cacheBasePayload();
flushQueue();
}
}, 50);

setTimeout(() => {
clearInterval(interval);
if (!loader.loaded) {
loader.loading = false;
algonomyLog("error", "SDK load timeout (10s)");
}
}, 10000);
}

function setCustomerIfExists() {
if (loader.customerSet) return;

const customer = init?.data?.customer;
if (customer?.id) {
const customerId = String(customer.id).split("/").pop();

try {
rcdp.setCustomer({
email: customer.email ?? "",
customerCode: customerId
});
loader.customerSet = true;
algonomyLog("log", "Customer identity set", customerId);
} catch (e) {
algonomyLog("error", "setCustomer failed", e);
}
}
}

function flushQueue() {
loader.queue.splice(0).forEach(fn => {
try { fn(); } catch (e) { algonomyLog("error", "Callback error", e); }
});
}
}
Payload Helpers
function encodePayload(payload) {
return btoa(unescape(encodeURIComponent(JSON.stringify(payload))));
}

function decodePayload(encoded) {
return JSON.parse(decodeURIComponent(escape(atob(encoded))));
}

function storePayload(payload) {
localStorage.setItem("__ALGONOMY_PAYLOAD", encodePayload(payload));
}

function getStoredPayload() {
const encoded = localStorage.getItem("__ALGONOMY_PAYLOAD");
return encoded ? decodePayload(encoded) : null;
}

function cacheBasePayload() {
if (!window.rcdp?.getEventPayload) return;
try {
const eventObj = rcdp.getEventPayload({}, "");
if (eventObj?.payload) storePayload(eventObj.payload);
} catch (e) {
algonomyLog("error", "Payload caching failed", e);
}
}
Homepage Detection Helper
function isHomepage(event) {
const pathname = event.context?.document?.location?.pathname || "";
const pageType = event.context?.page?.pageType || "";

return (
pathname === "/" ||
/^\/[a-z]{2}\/?$/.test(pathname) ||
pageType === "home" ||
pageType === "index"
);
}
Examples: Pixel rCDP Clickstream Integrations
The following examples cover standard eCommerce clickstream events implemented within Shopify Pixel.
Example 1: Home Page View
analytics.subscribe("page_viewed", (event) => {
if (!isHomepage(event)) return;

loadAlgonomy(() => {
rcdp.executeEventByData({}, "eventHomePage");
});
});
Example 2: Product View
analytics.subscribe("product_viewed", (event) => {
const variant = event.data?.productVariant;
if (!variant) return;

const data = {
productId: String(variant.product?.id ?? "").split("/").pop(),
price: String(variant.price?.amount ?? "0"),
brandId: variant.product?.vendor ?? "",
sku: variant.sku ?? "",
categoryId: ""
};

loadAlgonomy(() => {
AlgonomyPerf.measureEvent("eventProduct", () => {
rcdp.executeEventByData(data, "eventProduct");
});
});
});
Example 3: Add to Cart
analytics.subscribe("product_added_to_cart", (event) => {
const line = event.data?.cartLine;

if (!line) {
algonomyLog("warn", "cartLine missing", event.data);
return;
}

const eventData = {
productId: String(line.merchandise?.product?.id ?? "").split("/").pop(),
sku: line.merchandise?.sku ?? "",
price: String(line.merchandise?.price?.amount ?? "0"),
quantity: String(line.quantity ?? 1),
totalQuantity: String(line.quantity ?? 1)
};

loadAlgonomy(() => {
AlgonomyPerf.measureEvent("eventAddToCart", () => {
rcdp.executeEventByData(eventData, "eventAddToCart");
});
});
});
Example 4: Remove from Cart
analytics.subscribe("product_removed_from_cart", (event) => {
const line = event.data?.cartLine;

if (!line) {
algonomyLog("warn", "cartLine missing", event.data);
return;
}

const eventData = {
productId: String(line.merchandise?.product?.id ?? "").split("/").pop(),
sku: line.merchandise?.sku ?? "",
price: String(line.merchandise?.price?.amount ?? "0"),
quantity: String(line.quantity ?? 1)
};

loadAlgonomy(() => {
AlgonomyPerf.measureEvent("eventRemoveFromCart", () => {
rcdp.executeEventByData(eventData, "eventRemoveFromCart");
});
});
});
Example 5: Cart View
analytics.subscribe("cart_viewed", (event) => {
const lines = event.data?.cart?.lines || [];

const products = lines.map(line => ({
productId: String(line.merchandise?.product?.id ?? "").split("/").pop(),
sku: line.merchandise?.sku ?? "",
price: String(line.merchandise?.price?.amount ?? "0"),
quantity: String(line.quantity ?? 1)
}));

const eventData = {
products: products
};

loadAlgonomy(() => {
AlgonomyPerf.measureEvent("eventCartView", () => {
rcdp.executeEventByData(eventData, "eventCartView");
});
});
});
Example 6: Checkout Started
analytics.subscribe("checkout_started", (event) => {
const checkout = event.data?.checkout;

if (!checkout) return;

const eventData = {
checkoutId: checkout.id ?? "",
totalPrice: String(checkout.totalPrice?.amount ?? "0")
};

loadAlgonomy(() => {
AlgonomyPerf.measureEvent("eventCheckoutStart", () => {
rcdp.executeEventByData(eventData, "eventCheckoutStart");
});
});
});
Example 7: Checkout Completed (Order API)
Shopify Pixel does not expose complete order data directly. To capture full order details, you must call the Shopify Order API and then send the payload to rCDP.
analytics.subscribe("checkout_completed", async (event) => {
const checkoutId = event.data?.checkout?.id;

if (!checkoutId) return;

try {
const response = await fetch(`/orders/${checkoutId}.json`);
const order = await response.json();

const eventData = {
orderId: order.id,
totalPrice: order.total_price,
currency: order.currency
};

loadAlgonomy(() => {
AlgonomyPerf.measureEvent("eventPurchase", () => {
rcdp.executeEventByData(eventData, "eventPurchase");
});
});

} catch (e) {
algonomyLog("error", "Order fetch failed", e);
}
});
Sandbox Constraints
Shopify Web Pixels run inside a sandboxed iframe environment. This introduces certain limitations that must be considered during implementation.
-
Limited access to global window variables
-
Restricted DOM manipulation capabilities
-
External script loading must follow Shopify policies
-
Strict execution boundaries for security
Key Considerations
-
Ensure SDK is loaded before firing events
-
Avoid duplicate event firing
-
Validate payload structure against event taxonomy
-
Handle missing or null data gracefully
-
Test all events in Shopify preview mode
Summary
Shopify Pixel Instrumentation provides a flexible and powerful way to implement clickstream tracking with full control over event data. While it requires development effort, it enables advanced customization and supports complex tracking scenarios.
For most standard use cases, No-Code Instrumentation is recommended. Pixel Instrumentation should be used when additional flexibility and customization are required.
Next Steps
-
Review Shopify No-Code Instrumentation
-
Validate events using rCDP dashboard
-
Proceed to Clickstream Event APIs