SDK Methods
Real-time CDP supports the following SDK methods for iOS app:
Customer Profiles
Real-time CDP stores the user’s demographic data location, app and website interaction events, campaign visits and transaction history to give you a complete picture for every user.
A customer profile is automatically created for every user launching your mobile application.
Initially, the customer profile was created as ‘Anonymous’, which means that the profile does not yet contain any identifiable information about the user. You can enrich the profile with attributes such as Name, Age, and Customer ID.
Real-time CDP provides pre-defined profile properties such as Name, Phone, Gender, and Age to represent properties associated with a profile. It is strongly recommended to use these standard property names. Real-time CDP supports arbitrary single and multi-value profile properties.
An example of updating customer profile properties is given below:
- Notes:
- Set Customer Profile must be called before
eventCustomerCreate,eventLoginandeventLogout. - If the user logs in before the SDK integration, Set Customer Profile must be called immediately after initializing Real-time CDP.
Objective C
T1CustomerProfile *profile = [T1CustomerProfile new];
profile.custCode = self.txtCustomerCode.text;
profile.emailId = @"sample@mail.com";
profile.mobileNumber=@"9876543210";
[[TargetOne sharedInstance] setCustomerProfile:profile];Swift
let profile = T1CustomerProfile();
profile.custCode = "100"
profile.mobileNumber="9876543210"
profile.emailId="sample@email.com"
TargetOne.sharedInstance().setCustomerProfile(profile)Clickstream Events
A Clickstream Event is an event that a user takes in your mobile application. Real-time CDP records the event on the Customer Profile, using an Event Name and optional associated key:value-based Event Properties. This allows you to segment users, target, and personalize messaging based on both the Event Name and specific Event Properties.
Note: For more information about event types and event data, see Event Types.
An example of recording a clickstream event eventCategory is given below:
Objective-C
// event with properties
NSDictionary *props = @{
@"categoryId": @"100"
};
[[TargetOne sharedInstance] sendClickStream:@"eventCategory" withProps:props];
/**
* Data types:
* The value of a property can be of type NSDate, a NSNumber, a NSString, or a BOOL.
*
* NSDate object:
* When a property value is of type NSDate, the date and time are both recorded to the second.
* This can be later used for targeting scenarios.
* For e.g. if you are recording the time of the flight as an event property,
* you can send a message to the user just before their flight takes off.
*/Swift
// event with properties
let props = [
"categoryId": "100"
]
TargetOne.sharedInstance()?.sendClickStream ("eventCategory", withProps: props)
/**
* Data types:
* The value of a property can be of type NSDate, a Number, a String, or a Bool.
*
* NSDate object:
* When a property value is of type NSDate, the date and time are both recorded to the second.
* This can be later used for targeting scenarios.
* For e.g. if you are recording the time of the flight as an event property,
* you can send a message to the user just before their flight takes off.
*/In-App Notifications
Real-time CDP SDK allows you to show in-app notifications to your users. You can design the in-app notifications right from the dashboard, without writing any code.
Block In-App Notifications
Use the following code to block In-App notification on specific page or controller:
t1Config.arrBlockInApp=@[] //Array of controller class namesDebugging
By default, Real-time CDP logs are set to TargetOneLogLevel.info. During development, we recommend that you set the SDK to DEBUG, INFO, ERROR, WARN, and VERBOSE mode, to log warnings or other important messages to the iOS logging system.
This can be done by setting the debug level to TargetOneLogLevel.debug.
If you want to disable Real-time CDP logs for production environment, you can set the debug level to TargetOneLogLevel.off.
Objective-C
[TargetOne setLogLevel:T1_LL_VERBOSE];Swift
TargetOne.setLogLevel(T1_LOG_LEVEL.LL_DEBUG);Rich Push Notifications
iOS 10 has introduced rich push notifications feature which provides the capability to add image, video, audio, or GIF attachments to your push notifications.
Rich push notifications are enabled via a notification service extension, a separate and distinct binary embedded in your app bundle. Prior to displaying a new push notification, the system will call your notification service extension to modify the payload as well as add media attachments to be displayed.
Enable Rich Push Notifications for Your App
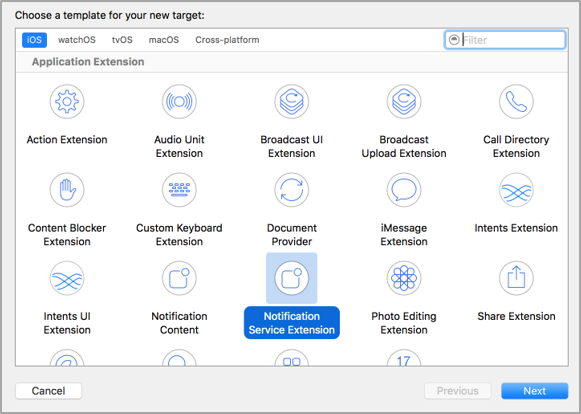
To create a notification service extension in your project:
-
In Xcode, select File > New > Target.
-
Choose the Notification Service Extension template.
Objective-C
#import "NotificationService.h"
@interface NotificationService ()
@property (nonatomic, strong) void (^contentHandler)(UNNotificationContent *contentToDeliver);
@property (nonatomic, strong) UNMutableNotificationContent *bestAttemptContent;
@end
@implementation NotificationService
- (void)didReceiveNotificationRequest:(UNNotificationRequest *)request withContentHandler:(void (^)(UNNotificationContent * _Nonnull))contentHandler
{
self.contentHandler = contentHandler;
self.bestAttemptContent = [request.content mutableCopy];
// check for media attachment, example here uses custom payload keys mediaUrl and mediaType
NSDictionary *userInfo = request.content.userInfo;
if (userInfo == nil) {
[self contentComplete];
return;
}
NSString *attachmentUrl = userInfo[@"attachment-url"];
if (attachmentUrl == nil) {
// self.bestAttemptContent.title = [NSString stringWithFormat:@"%@ [modified]", self.bestAttemptContent.title];
[self contentComplete];
return;
}
[self loadAttachmentForUrlString:attachmentUrl
completionHandler:^(UNNotificationAttachment *attachment) {
if (attachment) {
self.bestAttemptContent.attachments = [NSArray arrayWithObject:attachment];
}
[self contentComplete];
}];
}
- (void)serviceExtensionTimeWillExpire {
// Called just before the extension will be terminated by the system.
// Use this as an opportunity to deliver your "best attempt" at modified content, otherwise the original push payload will be used.
[self contentComplete];
}
- (void)contentComplete {
self.contentHandler(self.bestAttemptContent);
}
- (NSString *)fileExtensionForMediaType:(NSString *)urlString {
NSString *ext = urlString;
if ([urlString isEqualToString:@"image"]) {
ext = @"jpg";
}
else if ([urlString isEqualToString:@"video"]) {
ext = @"mp4";
}
else if ([urlString isEqualToString:@"audio"]) {
ext = @"mp3";
}
else
{
ext = [urlString pathExtension];
}
return [@"." stringByAppendingString:ext];
}
- (void)loadAttachmentForUrlString:(NSString *)urlString
completionHandler:(void(^)(UNNotificationAttachment *))completionHandler {
__block UNNotificationAttachment *attachment = nil;
NSURL *attachmentURL = [NSURL URLWithString:urlString];
NSString *fileExt = [self fileExtensionForMediaType:urlString];
NSURLSession *session = [NSURLSession sessionWithConfiguration:[NSURLSessionConfiguration defaultSessionConfiguration]];
[[session downloadTaskWithURL:attachmentURL
completionHandler:^(NSURL *temporaryFileLocation, NSURLResponse *response, NSError *error) {
if (error != nil) {
NSLog(@"%@", error.localizedDescription);
} else {
NSFileManager *fileManager = [NSFileManager defaultManager];
NSURL *localURL = [NSURL fileURLWithPath:[temporaryFileLocation.path stringByAppendingString:fileExt]];
[fileManager moveItemAtURL:temporaryFileLocation toURL:localURL error:&error];
NSError *attachmentError = nil;
attachment = [UNNotificationAttachment attachmentWithIdentifier:@"" URL:localURL options:nil error:&attachmentError];
if (attachmentError) {
NSLog(@"%@", attachmentError.localizedDescription);
}
}
completionHandler(attachment);
}] resume];
}
@endSwift
import UserNotifications
class NotificationService: UNNotificationServiceExtension {
var contentHandler: ((UNNotificationContent) -> Void)?
var bestAttemptContent: UNMutableNotificationContent?
override func didReceive(_ request: UNNotificationRequest, withContentHandler contentHandler: @escaping (UNNotificationContent) -> Void) {
self.contentHandler = contentHandler
bestAttemptContent = (request.content.mutableCopy() as? UNMutableNotificationContent)
if let bestAttemptContent = bestAttemptContent {
let userInfo = request.content.userInfo
let attachmentUrl = userInfo["attachment-url"] as? String
if attachmentUrl == nil {
// self.bestAttemptContent.title = [NSString stringWithFormat:@"%@ [modified]", self.bestAttemptContent.title];
contentComplete()
return
}
loadAttachment(
forUrlString: attachmentUrl,
completionHandler: { [self] attachment in
if let attachment = attachment {
bestAttemptContent.attachments = [attachment]
}
self.contentComplete()
})
}
}
override func serviceExtensionTimeWillExpire() {
// Called just before the extension will be terminated by the system.
// Use this as an opportunity to deliver your "best attempt" at modified content, otherwise the original push payload will be used.
if let contentHandler = contentHandler, let bestAttemptContent = bestAttemptContent {
contentHandler(bestAttemptContent)
}
}
func contentComplete() {
contentHandler!(bestAttemptContent!)
}
func fileExtension(forMediaType urlString: String?) -> String? {
var ext = urlString
if urlString == "image" {
ext = "jpg"
} else if urlString == "video" {
ext = "mp4"
} else if urlString == "audio" {
ext = "mp3"
} else {
ext = URL(fileURLWithPath: urlString ?? "").pathExtension
}
return "." + (ext ?? "")
}
func loadAttachment(
forUrlString urlString: String?,
completionHandler: @escaping (UNNotificationAttachment?) -> Void
) {
var attachment: UNNotificationAttachment? = nil
let attachmentURL = URL(string: urlString ?? "")
let fileExt = fileExtension(forMediaType: urlString)!
let session = URLSession(configuration: URLSessionConfiguration.default)
if let attachmentURL = attachmentURL {
session.downloadTask(with: attachmentURL, completionHandler: { temporaryFileLocation, response, error in
if let error = error {
print("\(error.localizedDescription)")
} else {
let fileManager = FileManager.default
let localURL = URL(fileURLWithPath: (temporaryFileLocation?.path ?? "") + fileExt)
do {
if let temporaryFileLocation = temporaryFileLocation {
try fileManager.moveItem(at: temporaryFileLocation, to: localURL)
}
} catch {
}
var attachmentError: Error? = nil
attachment = UNNotificationAttachment(identifier: "" + URL, localURL, options: nil, error: &attachmentError)
if let attachmentError = attachmentError {
print("\(attachmentError.localizedDescription)")
}
}
completionHandler(attachment)
}).resume()
}
}
}Disable Notification Auto Integration (Manual)
By default, auto integration mode on Real-time CDP SDK takes care of registering remote notification and its token callback and handles the notification rendering and open/click events.
If auto integration mode is disabled, then the app should pass the required information to Real-time CDP SDK to handle.
t1Config.disableAutoIntegrate= trueRegister Remote Notification
Real-time CDP supports the Carousel notifications. Add the following category identifier (T1_CAROUSEL_V1) when registering the remote notification:
UNUserNotificationCenter *center = [UNUserNotificationCenter currentNotificationCenter];
center.delegate = self;
UNNotificationCategory *cat = [UNNotificationCategory categoryWithIdentifier:@"T1_CAROUSEL_V1" actions:@[] intentIdentifiers:@[] options:UNNotificationCategoryOptionNone];
[center setNotificationCategories:[NSSet setWithObjects:cat, nil]];Real-time CDP requires the device token to send the push notification. Use the following code to register the push device token with Real-time CDP SDK.
Objective-C
- (void) application:(UIApplication *)application
didRegisterForRemoteNotificationsWithDeviceToken:(NSData *)deviceToken {
[[TargetOne sharedInstance] registerDeviceToken:deviceToken];
}Swift
func application(application: UIApplication,
didRegisterForRemoteNotificationsWithDeviceToken deviceToken: NSData) {
TagetOne.sharedInstance()?.registerDeviceToken(deviceToken)
}Handle Remote Notification
Real-time CDP SDK requires callback methods to handle the remote notifications and In-App notifications from Real-time CDP.
Objective-C
/** For iOS 10 and above - Foreground **/
- (void)userNotificationCenter:(UNUserNotificationCenter *)center willPresentNotification:(UNNotification *)notification withCompletionHandler:(void (^)(UNNotificationPresentationOptions))completionHandler{
[[TargetOne sharedInstance] handleRemoteNotification:notification.request.content.userInfo withCompletionHandler:completionHandler];
}Swift
- (void)userNotificationCenter:(UNUserNotificationCenter *)center willPresentNotification:(UNNotification *)notification withCompletionHandler:(void (^)(UNNotificationPresentationOptions))completionHandler
- {
TargetOne.sharedInstance()?.handleRemoteNotification(withData: notification.request.content.userInfo, withCompletionHandler: completionHandler)
}Notification Open Event
To capture the notification open event, use the following code:
Objective-C
/** For iOS 10 and above - Foreground **/
- (void)userNotificationCenter:(UNUserNotificationCenter *)center didReceiveNotificationResponse:(UNNotificationResponse *)response withCompletionHandler:(void (^)(void))completionHandler{
[[TargetOne sharedInstance] notificationOpen:response.notification.request.content.userInfo];
}Swift
- func userNotificationCenter(_ center: UNUserNotificationCenter, didReceive response: UNNotificationResponse, withCompletionHandler completionHandler: @escaping () -> Void) {
TargetOne.sharedInstance()?.notificationOpen(response.notification.request.content.userInfo)
}APNs Certificate Creation
Every iOS application that wants to use Apple Push Notification Services (APNs) needs to have an APNs certificate.
To generate an APNs certificate for your application:
-
Create a CSR from Your Keychain.
-
On your Mac, open Keychain Access, navigate to Certificate Assistant and select Request a Certificate From a Certificate Authority.
-
On the Certificate Assistant page, select Request is → Saved to Disk and keep the CA email address remain blank.
-
Click Continue and save the file. Your CSR is now ready!
-
-
Download an APNs Certificate from Your Account.
-
Log in to developer.apple.com, and navigate to the Member Center and select Certificates, Identifiers, and Profiles.
-
Select Certificates under your iOS Apps.
-
Choose Development/Production under certificates, depending on the certificate you want to generate, and then click + button to add a certificate.
-
Select Apple Push Notification service SSL (Sandbox), click Continue and select the Application ID for which you want to create the Certificate.
-
Upload the CSR file created in Step 1.
-
Download the generated certificate.
-
-
Convert the .cer File to a .p12 Certificate.
-
Open the .cer certificate file that you just downloaded; it will open Keychain Access.
-
Select your certificate, right click, and choose to export your certificate in a .p12 format.
Your APNs certificate is now ready!
-
APNs Auth Key Creation
If you want to send push notifications to your iOS users, you will need to upload either an APNs Push Certificate or an APNs Auth Key.
We recommend that you create and upload an APNs Auth Key for the following reasons:
-
You do not need to regenerate the push certificate every year.
-
You can use one auth key for all your apps. This avoids the complication of maintaining different certificates.
To send push notifications using an APNs Auth Key, the following information is required:
-
Auth Key file
-
Team ID
-
Your app’s bundle ID
To create an APNs auth key:
-
Visit the Apple Developer Member Center.
-
Click Certificates, Identifiers & Profiles.
-
Go to Keys from the left menu.
-
To create a new Auth Key, click + in the top right corner.
-
Add a Key Name and select APNs.
-
Click Continue.
Note: You will be able to download the Auth Key file. Do not rename this file. Upload it as it is to the dashboard.
-
Locate your Team ID. Click on your name/company name at the top right corner, then select View Account.
-
Copy your Team ID, go to the Real-time CDP dashboard, and navigate to Settings > Push > iOS.
-
Upload the APNs Auth Key file, which you downloaded earlier, and type your Team ID and your app’s bundle ID. Your app’s bundle ID can be found in Xcode.
-
Select the appropriate mode for sending push notifications, such as Production or Development.